Configuring Remote Desktop Services with Microsoft Entra Application Proxy (Azure Application Proxy)
In a perfect world, Remote Desktop Services (RDS) wouldn’t be necessary—modern cloud solutions like SharePoint, Teams, and OneDrive, combined with cloud-native business apps, should eliminate the need for traditional networks. However, the reality is that legacy applications remain deeply embedded across various industries, and with the rise of remote work, RDS continues to be a reliable solution for providing secure access to these systems.
That said, securing RDS has never been more critical. Traditional setups often require exposing RD Gateway to the internet, creating significant security risks. Microsoft Entra Application Proxy provides a far more secure alternative, enabling seamless remote access to RDS without opening inbound firewall ports. When combined with Conditional Access Policies and dynamic user targeting, this approach transforms RDS into a modern, secure, and flexible remote access solution.
In this guide, I’ll walk you through setting up Remote Desktop Services with Microsoft Entra Application Proxy, ensuring a secure and efficient remote access solution. We’ll cover prerequisites, deployment steps, SSL configuration, and best practices to enhance security. By the end of this tutorial, you’ll have a fully operational RDS environment protected by Entra ID, providing users with secure, authenticated remote access.
Prerequisites
- Microsoft Entra (Azure AD) P1 or P2 licence (included in A3/A5)
- Existing Remote Desktop Services Server configured with:
- RD Gateway
- RD Web Access
- RD Session Host
- Valid RDS User CALs (Client Access Licenses)
- A Windows Server to host the Microsoft Entra Private Network Connector
- A Publicly Trusted SSL Certificate (Info In the guide)
1. Obtaining a Public SSL Certificate
In my testing I did manage to get the web client working with a self-signed certificate however there was a lot of messing about, it’s recommended to use a publicly trusted SSL certificate, these can be obtained for free using Lets Encrypt or can be obtained pretty cheap from sites like IONOS and other web hosting providers.
In most cases, your RDS server will likely have a FQDN of server.yourdomain.local which is not publicly accessible, I will show you how to get the SSL for a publicly accessible domain name (normally your website domain) e.g. server.yourdomain.co.uk and assign it to the local server.
- 1. Buy or obtain an SSL Certificate:
- Purchase an SSL Certificate. I personally use IONOS, which costs £30 and can be exported as a .PFX file, required for Windows Server. You can get cashback with my link (#ad).
- Choose a suitable certificate type (e.g., Single Domain for server.yourdomain.co.uk).
- Complete the purchase and retrieve the certificate files.

- 2. Install the SSL Certificate on the RDS Server:
- Open MMC (
Win + R, typemmc, press Enter). - Go to File > Add/Remove Snap-in > Select Certificates > Choose Computer Account.
- Navigate to Personal > Certificates and Import the IONOS certificate.
- Open MMC (
- 3. Ensure Proper DNS Resolution:
- Since your internal FQDN is server.yourdomain.local, you need to create a Forward Lookup Zone for server.yourdomain.co.uk in your internal DNS.
- Add an A Record pointing server.yourdomain.co.uk to the internal server IP.
- This ensures that internal users access the same domain name as external users, preventing SSL certificate errors.

- 4. Bind the SSL Certificate to RDS Roles:
- Open Remote Desktop Services Configuration in Server Manager.
- Under Tasks > Edit Deployment Properties, assign the newly installed SSL certificate to RD Web Access, RD Gateway, and RD Connection Broker.

- 5. Bind the SSL Certificate to IIS:
- Open Internet Information Services (IIS).
- Under Default Website > Bindings, assign the newly created SSL certificate to HTTPS.

2. Enable WebSocket Protocol in IIS
1. Open Server Manager > Add Roles and Features.
2. Under Application Development, ensure WebSocket Protocol is enabled.
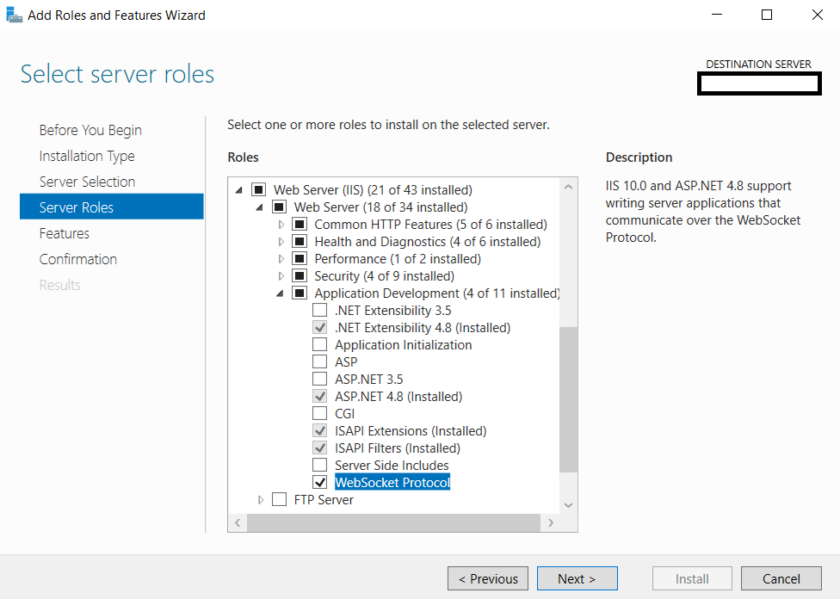
3. Restart IIS:
iisreset3. Installing the HTML5 Web Client
Export RD Web Certificate as .Cer File
Before we begin installing the RD Web Client, we first need to get our SSL certificate as a .CER file.
1. Open Manage Computer Certificates via MMC snap-in or search for it.
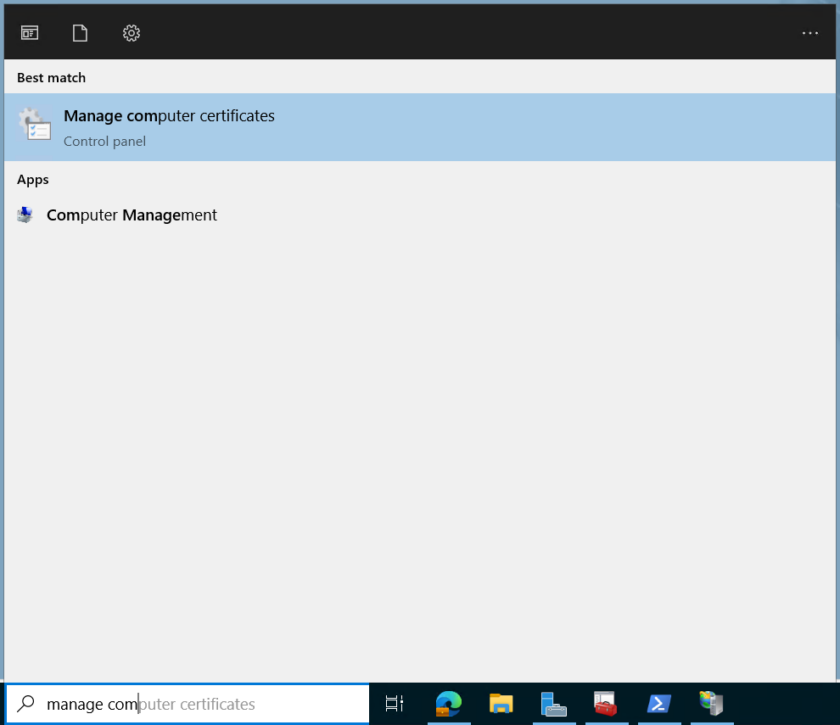
2. Navigate to Personal > Certificates and find the publicly trusted certificate.

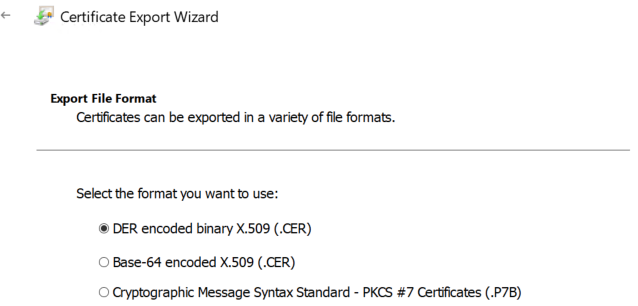
3. Right-click the certificate and select All Tasks > Export.
4. Choose No, Do not export the private key, then select DER Encoded Binary X.509 (.cer) format.
5. Save the certificate to an accessible location, e.g., C:\Certs.
Install RD Web Client
1. Install PowerShellGet:
Install-Module -Name PowerShellGet -Force2. Restart PowerShell *Important.
3. Install RD Web Client Module:
Install-Module -Name RDWebClientManagement4. Install Web Client Package:
Install-RDWebClientPackage5. Import the exported .CER file:
Import-RDWebClientBrokerCert "C:\certs\certname.cer"6. Publish the web client:
Publish-RDWebClientPackage -Type Production –Latest
Enforcing Web Client
In order to enforce the use of the web client and stop the downloading of the RDP file, we can sue the following CMDlet.
Set-RDWebClientDeploymentSetting -Name "LaunchResourceInBrowser" $trueReset IIS.
iisresetTesting your RD Web Installation
If you have correctly setup the internal DNS and the RD WebClient, you should now be able to browse to the login page from any internal PC. Visit the link i any modern browser, Replacing server.yourdomain.co.uk with your actual domain name (that matches the certificate)
https://server.yourdomain.com/rdweb/webclient
Sign in with your username and password.
Note: By default all users in ‘Domain Users’ has access to remote access, I recommend configuring Connection Authorisation Policies (CAP) to restrict RDS access to pre-defined users, for example users in the ‘Remote Access’ security group.
Test your connection by launching the Remote Access RDP File, it should open up in the browser.

Once you have confirmed the web client is working on your internal network, its time to setup the Application Proxy.
4. Install Private Network Connector
The next step is to install the Private Network Connector on a server within the same network as your RDS server.
The server must run Windows Server 2016 or later with .NET Framework 4.7.2+ and have outbound internet access on ports 443 and 80 to communicate with Microsoft Entra services.
*.msappproxy.net
*.servicebus.windows.net
*.microsoftonline.com
*.msauth.net
Head to Identity (Azure AD) > Applications > Enterprise Applications > Private Network Connectors

Click ‘Download Connector Service‘
Accept the terms and install the service on your RDS Server.

Continue the setup and enter your Global Administrator details.
5. Create Entra ID (Azure) Application
Head to Identity > Applications > Enterprise applications.
Select Create your own application at the top and then Choose Configure application proxy for secure remote access to an on-premises application.
Give your application a suitable name.

Populate the app details with your Internal URL, This is the URL you created a SSL Certificate and DNS records for earlier, for example server.yourdomain.co.uk
For the External URL either use the MS provided URL or a custom URL if you have your custom domain linked to your tenant.

Under Advanced, untick Translate URLs in Headers

Create the app.
Changing the app homepage
By default if you navigate to your app proxy link, it will display the default IIS splash page, the same way as it would if you visited server.yourdomain.co.uk in the browser internally. We want to change this so it displays the RD web client login page.
Open Your Enterprise App > Properties and click the link to Manage Additional Properties

Change the app homepage to yourappproxyurl/RdWeb/Webclient

Save your changes.
Assign Your App to Users
In order to have access to your remote access application, users must be first assigned to the app. While Viewing your app, click Users & Groups.
Assign access to a security group which contains the users you wish to allow access to. For Example ‘Remote Access‘. This gives you granular control over who is authorised to use remote access.

Change the RD Gateway URL
To ensure seamless access through Entra Application Proxy, you need to update the RD Gateway URL to match your published proxy address.
-
-
-
-
- Open Server Manager on your RD Gateway server.
- Click Tasks > Edit Deployment Properties, update the RD Gateway FQDN to your Entra Proxy URL.
-
-
-

Testing your RDS solution through Entra Application Proxy
Once setup is complete, test the application is working by browsing to the External App Proxy Link.
https://remote-mytenant.msappproxy.net/rdweb/webclientYou should be able to access the login page now. If you experience connection errors like ‘Gateway Timeout‘. Ensure the server the Entra Private Network Connector sits on has outbound access to the MS URLS in Step 4 on ports 443 and 80. If you use SSL Decryption you may need to exclude certain MS URLS to enable a successful connection.

6. Enforce Multi-Factor Authentication (MFA) (Recommended)
To enhance security, you can enforce Multi-Factor Authentication (MFA) every time users access Remote Desktop Services (RDS) through Entra Application Proxy. This ensures that even if credentials are compromised, unauthorised access is prevented.
-
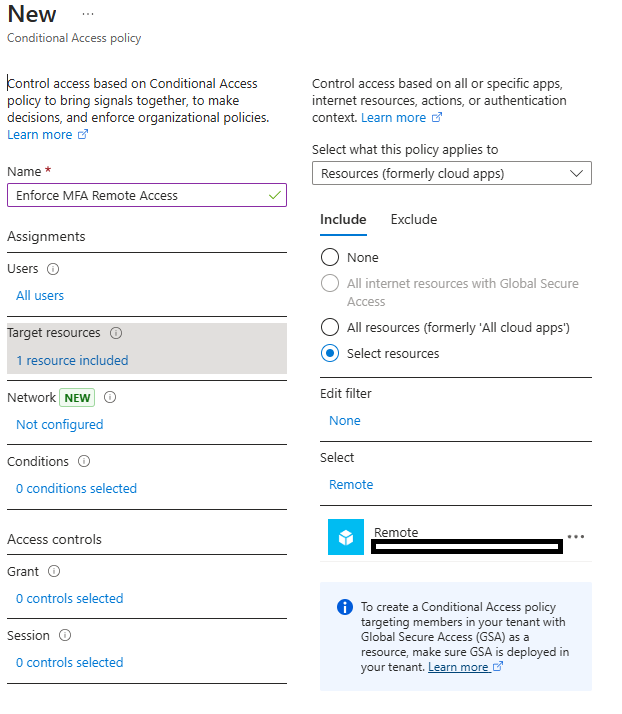
- 1. Open your Enterprise App
- 2. Under Security, select Conditional Access and click New Policy.
- 3. Set the policy name (e.g. Enforce MFA for Remote Access).
- 4. Under Assignments > Users and groups, select All Users
- 5. Under Cloud apps or actions, choose Select apps, then pick your RDS application.
-
- 6. Under Grant Controls, select Require multi-factor authentication.

-
- 7. Click Enable Policy > On, then Create.
- 8. Under Session, set the Sign-in Frequency to Every Time.

You should now be able to set up Remote Desktop Services (RDS) securely using Microsoft Entra Application Proxy, without opening up ports or direct access to your network.

#EdTech Network Manager, experienced in Microsoft 365, Server 2019, Intune, SCCM and anything inbetween.
I have followed the guide and it’s working, but access to the original gateway is still available, is there anything you can do to secure the gateway URL.
i.e. remote.microsoft.com/RDWeb
Do I need to change the External DNS Setting to the new remote-microsoft.msappproxy.net or will this break RDS.
Hi James, yes you can redirect the old /RDweb using HTTP Redirect. In IIS go to your ‘default site’ drop it down and click “/RDWEB”, under HTTP Redirects it should already be pointing to /Pages, just change this to /webclient and restart IIS 🙂
curious if you have found a way to make this span multiple monitors? I’ve set this up before but for the life of me cannot get it to authenticate when downloading and running the .rdp file.
I haven’t tried if i’m honest, i’m guessing with it being contained in the web browser it might not be possible to span two monitors